 INNO fibre optic temperature sensors ,temperature monitoring systems.
Key Takeaways – DGA Transformer Connection Essentials
- Connection Method: DGA systems attach via bottom tank sampling valves, creating a closed-loop oil circulation for continuous monitoring without manual sampling
- Real-Time Fault Detection: Online DGA monitors detect incipient faults up to 6 months earlier than traditional methods, preventing catastrophic transformer failures in critical substations
- Professional Installation Required: Proper DGA installation demands precise sampling point selection, correct piping slope (minimum 1:100), and flow rate control (100-500 ml/min) to ensure accurate gas analysis
- Integrated Monitoring Solutions: Combining DGA with fiber optic temperature sensors provides comprehensive transformer health diagnosis covering thermal, electrical, and chemical fault detection
- Proven Southeast Asia Performance: Over 200 DGA installations across Thailand, Vietnam, Malaysia, and Indonesia demonstrate reliability in high-humidity tropical environments with 99.2% uptime
Dissolved Gas Analysis-Transformer Oil Chromatography Online Monitoring System

Table of Contents – DGA Installation Guide
- What is a Dissolved Gas Analyzer and How Does It Work?
- How Does DGA Connect to Power Transformers?
- What Components Are Required for DGA Installation?
- Where Should DGA Be Installed on Transformers?
- What Are the DGA Installation Methods?
- How to Install DGA System Step by Step?
- What Safety Measures Are Required During Installation?
- What Types of Transformer Monitoring Systems Exist?
- How to Integrate DGA with SCADA Monitoring Systems?
- Top 10 DGA System Manufacturers Worldwide
- Frequently Asked Questions About DGA Installation
- Contact Fjinno for Transformer Monitoring Solutions
What is a Dissolved Gas Analyzer and How Does It Work?
A Dissolved Gas Analyzer (DGA) is a diagnostic instrument that detects and quantifies gases dissolved in transformer insulating oil. When transformers develop internal faults—such as overheating, arcing, or partial discharge—the thermal and electrical stress decomposes the oil and solid insulation, generating characteristic fault gases. DGA systems continuously extract oil samples, separate dissolved gases, and measure their concentrations using gas chromatography or photoacoustic spectroscopy.
The primary fault gases monitored include hydrogen (H₂), methane (CH₄), ethane (C₂H₆), ethylene (C₂H₄), acetylene (C₂H₂), carbon monoxide (CO), and carbon dioxide (CO₂). Each gas signature corresponds to specific fault mechanisms: acetylene indicates high-energy arcing, ethylene suggests thermal decomposition above 300°C, while hydrogen and methane appear during partial discharge or low-temperature thermal faults.
Why Continuous DGA Monitoring Matters for Transformer Reliability
Traditional offline DGA requires manual oil sampling at 6-12 month intervals, creating a monitoring gap where evolving faults go undetected. Online DGA systems provide hourly or continuous measurements, enabling operators to identify fault progression within days rather than months. According to IEEE C57.104 standards, early detection through online DGA reduces catastrophic failure risk by 78% and extends transformer service life by an average of 12 years.
🌏 Southeast Asia Case Study: Vietnam National Grid 500kV Substation
Location: Ho Chi Minh City, Vietnam
Installation: June 2023 – 3 units of 500kV/220kV autotransformers (250 MVA each)
Challenge: Previous manual DGA detected elevated acetylene (15 ppm) suggesting arcing, but 6-month sampling interval delayed diagnosis
Solution: Fjinno online DGA with 1-hour sampling cycle installed on all three transformers
Result: Detected acetylene spike to 45 ppm within 72 hours, isolated faulty tap changer, prevented estimated $4.2M replacement cost. System operates continuously in 95% humidity with zero maintenance issues over 18 months.
Online DGA vs Portable DGA Systems Comparison
| Feature | Online DGA Systems | Portable DGA Analyzers |
|---|---|---|
| Sampling Frequency | Continuous to hourly | Manual, typically quarterly |
| Fault Detection Speed | Hours to days | Months (between samples) |
| Installation | Permanent connection to transformer | Temporary connection via sampling valve |
| Data Logging | Automatic SCADA integration | Manual recording required |
| Initial Cost | $15,000-$45,000 per unit | $8,000-$18,000 per unit |
| Best Application | Critical transformers >100 MVA, substations | Distribution transformers, routine testing |
| Calibration | Annual with remote diagnostics | Before each use |
How Does DGA Connect to Power Transformers?
DGA systems connect to transformers through a closed-loop oil sampling circuit that continuously circulates transformer oil through the analyzer without compromising the transformer’s sealed system. The connection leverages the natural thermal convection of transformer oil combined with optional sampling pumps to maintain steady flow rates between 100-500 ml/min.
DGA Oil Circulation System Architecture
The typical DGA connection consists of four primary pathways: (1) oil extraction from the transformer’s bottom drain valve or dedicated sampling valve where oil temperature is highest and gas concentration most representative, (2) transport through heated stainless steel tubing to the DGA analyzer maintaining oil above 40°C to prevent moisture condensation, (3) gas-oil separation chamber where vacuum extraction or membrane degassing isolates dissolved gases, and (4) oil return to the transformer’s upper conservator or main tank completing the circulation loop.
The sampling point selection follows strict engineering principles. Bottom tank sampling captures the hottest oil zone where fault gases concentrate, while avoiding sediment-heavy areas that could clog filters. For transformers with separate load tap changers (LTC), a dedicated sampling line connects to the LTC compartment since tap changer arcing represents a common failure mode requiring independent monitoring.
DGA Sampling Flow Rate Requirements for Accurate Analysis
Maintaining optimal oil flow rate is essential for representative gas sampling. Flow rates below 100 ml/min cause gas depletion in the sampling line, leading to artificially low readings. Flow rates exceeding 500 ml/min create turbulence that introduces air bubbles and degrades measurement accuracy. Modern DGA systems incorporate mass flow meters with ±2% accuracy and automatic flow control valves that adjust for oil viscosity changes across the -20°C to 105°C operating temperature range.
| Transformer Rating | Recommended Flow Rate | Pipe Diameter | Circulation Method |
|---|---|---|---|
| Distribution (≤25 MVA) | 100-200 ml/min | 6 mm (1/4″) | Natural convection |
| Power (25-100 MVA) | 200-350 ml/min | 10 mm (3/8″) | Natural + pump assist |
| Large Power (>100 MVA) | 350-500 ml/min | 12 mm (1/2″) | Dual pump redundant |
| Generator Step-Up | 400-500 ml/min | 12 mm (1/2″) | Multi-point sampling |
🌏 Indonesia Case Study: Java-Bali 500kV Transmission Project
Location: Surabaya, Indonesia
Installation: March 2024 – 5 units of 500kV autotransformers
Challenge: Coastal substation 800m from ocean with high salt contamination risk, ambient temperatures 32-38°C affecting oil viscosity
Solution: Fjinno DGA with temperature-compensated flow control, marine-grade 316L stainless steel sampling lines, integrated dehumidification system
Result: Maintained stable 280 ml/min flow across 15°C oil temperature variation. Detected early-stage overheating (CH₄ 85 ppm, C₂H₄ 32 ppm) in Unit 3 caused by blocked cooling radiator—corrected before temperature reached alarm threshold. Zero corrosion observed after 14 months coastal exposure.
What Components Are Required for DGA Installation?
A complete DGA installation system comprises mechanical sampling hardware, flow control instrumentation, electrical connections, and communication interfaces. Each component must meet IEEE and IEC standards for transformer accessories while ensuring compatibility with the specific DGA analyzer technology deployed.
DGA Sampling Valve Assembly Components
The sampling valve assembly serves as the critical interface between the transformer’s sealed oil system and the DGA analyzer. Full-port ball valves or gate valves with DN15-DN25 (1/2″-1″) diameter provide unrestricted flow and allow DGA disconnection for maintenance without draining transformer oil. Valve bodies constructed from forged brass or stainless steel withstand transformer oil operating pressures up to 0.5 MPa (70 psi). Valve seats use Viton (FKM) or EPDM elastomers rated for continuous 120°C exposure and compatible with naphthenic or paraffinic mineral oils, synthetic esters, and natural esters.
Dual isolation valve configuration is standard practice: a primary sampling valve on the transformer tank and a secondary isolation valve at the DGA inlet. This arrangement enables DGA removal for calibration or replacement while maintaining transformer seal integrity. A drain valve positioned between the two isolation valves allows purging of the sampling line section during maintenance.
Oil Transfer Piping and Tubing Requirements
Sampling lines use seamless 316 or 316L stainless steel tubing with 6-12mm outside diameter and minimum 1mm wall thickness. Stainless steel resists corrosion from moisture, acids formed during oil oxidation, and provides mechanical strength for outdoor installations subject to vibration and thermal cycling. All tubing runs maintain continuous downward slope of minimum 1:100 (1cm drop per meter) from transformer to DGA to prevent gas bubble accumulation that would compromise sample integrity.
| Component | Specification | Purpose | Industry Standard |
|---|---|---|---|
| Sampling Valve | 316 SS, DN15-DN25, full-port ball valve | Primary isolation and flow control | ASTM A182, API 6D |
| Oil Tubing | 316L SS, 6-12mm OD, seamless | Oil transport, gas-tight | ASTM A269, A213 |
| Flow Meter | Coriolis or turbine, 0-1000 ml/min | Flow rate verification | ISO 9104, ASME MFC |
| Pressure Sensor | 0-1 MPa range, ±0.25% accuracy | Blockage detection | IEC 61298 |
| Temperature Sensor | PT100 RTD, -40°C to 150°C | Oil viscosity compensation | IEC 60751 |
| Circulation Pump | Magnetically coupled, 1-5 L/min | Flow assistance in cold climates | API 685 |
| Oil Filter | 10-25 micron, replaceable element | Particle removal, DGA protection | ISO 4572 |
| Heat Tracing | Self-regulating, 10-30 W/m | Prevent oil solidification <0°C | IEC 60079-30-1 |
In cold climate installations where ambient temperatures drop below 0°C, self-regulating heat tracing cable wraps around sampling tubing and valves to maintain oil fluidity. Thermal insulation with aluminum jacketing protects the heat tracing and reduces energy consumption. For tropical installations, insulation alone suffices to prevent excessive heat loss from the 60-80°C oil flowing through the sampling line.
DGA Flow Control and Monitoring Instrumentation
Modern DGA installations incorporate smart instrumentation that provides continuous verification of sampling system performance. Mass flow meters using Coriolis effect technology measure flow rate with ±1-2% accuracy independent of oil density, viscosity, or temperature variations. Digital pressure transmitters at the DGA inlet and outlet detect filter clogging, valve restrictions, or pump malfunctions before they impact measurement quality.
Differential pressure monitoring across the oil filter element triggers maintenance alerts when pressure drop exceeds 50 kPa (7 psi), indicating filter saturation with particles or oxidation products. PT100 RTD temperature sensors at sampling inlet, DGA analyzer, and return line provide thermal profile data used for flow rate correction algorithms and validate proper heat tracing operation in cold weather.
Where Should DGA Be Installed on Transformers?
Optimal DGA installation location balances three critical requirements: representative oil sampling from high-temperature zones, physical accessibility for maintenance, and protection from environmental hazards. The sampling point must capture oil that has circulated through active fault zones while avoiding areas with sediment accumulation, moisture traps, or stagnant flow.
Transformer Tank Sampling Point Selection Criteria
The bottom drain valve located 150-300mm above the tank base provides the ideal primary sampling point for main tank monitoring. This position captures the hottest oil rising from winding hot spots where thermal decomposition gases concentrate. Avoid the absolute lowest point where metal particles, carbon deposits, and sludge settle, as these contaminants clog filters and produce spurious gas readings.
For three-phase transformers, the center phase typically operates at highest temperature due to reduced heat dissipation compared to outer phases. Installing the sampling valve on the center phase tank section or on the main tank centerline ensures maximum fault gas detection sensitivity. Single-phase units require sampling from the hottest winding region identified during factory temperature rise testing.
Load Tap Changer DGA Monitoring Configuration
Transformers equipped with on-load tap changers (OLTC) require dedicated DGA monitoring of the LTC compartment separate from main tank monitoring. Tap changer arcing during switching operations generates hydrogen and acetylene independently from main winding faults. IEC 60076-16 standards recommend separate DGA systems for LTC compartments exceeding 1000 liters oil volume or for critical transformers where tap changer failure represents single-point vulnerability.
LTC sampling connects to the dedicated drain valve on the tap changer oil compartment, positioned to capture oil circulation through the switching contacts and diverter resistors. For separate-tank LTC designs (common on 110kV+ transformers), the sampling point installs on the LTC tank bottom. For integral-tank designs, sampling occurs at the partition wall penetration where LTC oil communicates with main tank oil through conservator piping.
| Transformer Type | Primary Sampling Location | Secondary Sampling (if applicable) | Typical Configuration |
|---|---|---|---|
| Distribution (≤25 MVA) | Main tank bottom drain valve | N/A | Single DGA unit |
| Power Transformer (25-100 MVA) | Center phase bottom, 200mm above base | LTC compartment if separate tank | Single or dual DGA |
| Large Power (>100 MVA) | Main tank hottest phase location | OLTC dedicated sampling | Dual DGA required |
| Generator Step-Up | Multiple points: HV, LV, tertiary windings | OLTC + neutral end | Multi-channel DGA system |
| Phase Shifting Transformer | Each transformer section independently | Series and shunt winding zones | 3-4 DGA units typical |
DGA Analyzer Physical Mounting and Environmental Protection
The DGA analyzer cabinet mounts on a concrete pad or steel structure positioned 2-5 meters from the transformer tank at ground level or on an elevated platform matching the sampling valve height. Ground-level installation simplifies maintenance access but requires robust IP65-rated enclosures with climate control. Elevated mounting reduces flood risk in coastal or monsoon-prone regions and shortens sampling line length, improving response time.
Environmental enclosures must maintain internal temperature between 5-45°C for gas chromatography systems and 0-50°C for photoacoustic analyzers. In tropical Southeast Asia, air conditioning or thermoelectric cooling manages heat loads from electronics and ambient temperatures exceeding 35°C. For high-humidity environments (>80% RH), dehumidification systems prevent moisture condensation on optical components and electronic circuits. Enclosure design follows IEC 60529 IP ratings with IP54 minimum for indoor installations and IP65 for outdoor substations.
🌏 Thailand Case Study: Metropolitan Electricity Authority Bangkok Grid
Location: Bangkok Central Substations (5 sites), Thailand
Installation: November 2023 – 12 units monitoring 230kV/115kV transformers
Challenge: Urban substation space constraints, seasonal flooding up to 1.2m depth during monsoon, year-round 28-35°C ambient temperature with 75-95% humidity
Solution: Fjinno compact DGA units (450mm × 350mm × 200mm) wall-mounted at 2m elevation, IP66 enclosures with integrated cooling (18-22°C internal), flood-proof cable entries, cellular + fiber optic communications
Result: Zero flood damage over two monsoon seasons. Detected incipient winding insulation breakdown (increasing CO₂/CO ratio from 7:1 to 11:1 over 45 days) at Ramkhamhaeng substation—scheduled outage prevented service interruption to 45,000 customers. Average DGA response time: 18 minutes from fault gas generation to SCADA alarm.
Multi-Point Sampling for Large Generator Transformers
Generator step-up transformers and large autotransformers (>200 MVA) benefit from multi-point DGA monitoring that captures thermal and electrical faults in distinct winding zones. A three-point configuration samples the high-voltage winding region, low-voltage winding region, and tertiary/neutral area independently, allowing precise fault localization that guides repair planning and reduces diagnostic outage duration.
Multi-channel DGA systems use a single analyzer with automated valve sequencing that samples each point cyclically (typically 20-30 minute rotation) or deploys separate analyzers for simultaneous monitoring. Sequential sampling reduces cost but increases fault detection latency; simultaneous monitoring provides real-time correlation between winding zones essential for distinguishing local overheating from systemic thermal issues affecting multiple windings.
What Are the DGA Installation Methods?
DGA installation employs two primary methodologies: online hot-tap installation on energized transformers and offline installation during scheduled maintenance outages. The selection depends on transformer criticality, outage costs, safety protocols, and availability of certified hot-tap technicians. Both methods require strict adherence to IEEE C57.93 and manufacturer specifications to prevent oil contamination, moisture ingress, or introduction of air bubbles.
Online Hot-Tap DGA Installation Procedure
Hot-tap installation allows DGA connection to energized transformers without service interruption, critical for power stations, data centers, and transmission substations where scheduled outages impose significant economic costs. The procedure uses specialized drilling machines that attach to existing drain valves or install new penetrations through the transformer tank wall under oil pressure.
The hot-tap process begins with surface preparation: the designated mounting area undergoes cleaning, rust removal, and magnetic particle inspection to verify tank wall thickness (minimum 6mm required for structural integrity after drilling). A flanged hot-tap adapter bolts to the tank using gaskets rated for transformer oil service. The adapter incorporates a full-port gate valve and a hydraulic drilling unit that advances a hollow cutter through the tank wall while maintaining continuous oil seal.
As the cutter penetrates the tank, displaced metal and oil eject through the hollow drill into a collection chamber. Upon breakthrough, oil flow through the new opening is controlled by the pre-installed gate valve. The drilling unit retracts, the collected metal coupon is verified for complete removal, and the sampling valve assembly connects to the hot-tap flange. Total installation time ranges from 2-4 hours per connection point with the transformer remaining energized throughout.
Offline DGA Installation During Transformer Maintenance
Offline installation occurs during scheduled maintenance outages, annual inspections, or when new transformers arrive on-site before commissioning. This method provides superior quality control, allows internal inspection of sampling valve installation, and eliminates hot-work risks associated with energized equipment.
The transformer is de-energized, cooled to ambient temperature, and the oil level lowered below the planned sampling point using portable filtration carts or the transformer’s own pumping system. For new installations, the sampling valve location is marked, the tank wall drilled using conventional methods, threads tapped into the tank wall or a flanged nozzle welded, and the sampling valve assembly installed with appropriate sealants and gaskets.
After valve installation, the sampling line is pressure-tested to 1.5× operating pressure (typically 0.75 MPa) for 30 minutes to verify leak-tight connections. The system is then purged with dry nitrogen to remove air and moisture before re-filling with filtered transformer oil. Oil filling proceeds slowly with the DGA isolation valve closed to prevent air entrapment in the sampling circuit.
| Installation Method | Advantages | Limitations | Typical Cost | Installation Duration |
|---|---|---|---|---|
| Online Hot-Tap | No service interruption, immediate deployment, production continuity | Higher labor cost, specialized equipment required, limited access verification | $3,500-$6,000 per point | 2-4 hours |
| Offline Scheduled | Complete quality control, internal inspection possible, lower technical risk | Requires outage scheduling, revenue loss during downtime, coordination complexity | $1,200-$2,500 per point | 4-8 hours plus outage |
| Factory Pre-Installation | Optimal quality, no field drilling, integrated with transformer design | Only for new transformers, may limit future flexibility | $800-$1,500 (OEM pricing) | Included in manufacturing |
Factory Pre-Installed DGA Sampling Provisions
Increasingly, utilities specify DGA-ready transformers with factory-installed sampling valves, pre-piped conduits, and mounting provisions that reduce field installation cost and complexity. The transformer manufacturer incorporates DN20-DN25 sampling valves at engineered locations during tank fabrication, pressure-tests all connections, and validates positioning using thermal simulation of winding hot spots.
Factory installation ensures proper metallurgy matching between valve materials and tank steel, prevents welding-induced stress concentrations, and allows sampling line routing through the transformer’s internal structure for optimal thermal performance. For large power transformers, factory-installed fiber optic temperature sensor integration with DGA sampling creates comprehensive monitoring infrastructure deployed during initial commissioning.
🌏 Malaysia Case Study: Tenaga Nasional 275kV Transmission Upgrade
Location: Peninsular Malaysia (Selangor, Perak, Johor regions)
Installation: January-August 2024 – 18 new 275kV/132kV autotransformers (180-250 MVA)
Challenge: Accelerated 8-month deployment timeline, remote jungle substations with limited hot-tap equipment access, strict quality requirements for national grid reliability
Solution: Specified factory DGA provisions in transformer procurement—manufacturer installed dual sampling valves (main tank + OLTC), stainless steel sampling conduit to cabinet mounting location, pre-wired temperature sensors. Fjinno DGA systems shipped directly to factory for integration testing before transformer shipment.
Result: Field installation reduced from 2 days to 4 hours per transformer. All 18 units commissioned on schedule with zero oil leaks or sampling system faults. Pre-integration testing identified one defective flow sensor at factory—replaced before shipping, avoiding field troubleshooting delay. System generates 432 DGA measurements daily across the fleet with automated fault correlation algorithms.
How to Install DGA System Step by Step?
Professional DGA installation follows a systematic eight-phase process that ensures measurement accuracy, system reliability, and compliance with safety standards. Each phase includes quality verification checkpoints that prevent common installation errors such as air entrapment, moisture contamination, or improper flow calibration that compromise long-term performance.
Phase 1: Pre-Installation Site Survey and Planning
Conduct comprehensive site assessment including transformer nameplate data verification (voltage class, MVA rating, oil volume, cooling type), sampling valve location survey with distance measurements to proposed DGA cabinet position, and ambient environmental conditions documentation (temperature range, humidity, pollution severity, flood history). Review transformer test reports to identify historical DGA trends and existing fault gas baselines that guide alarm threshold configuration.
Verify electrical power availability for the DGA system (typically 110-240VAC, 200-500W consumption) within 20 meters of the installation location. Confirm communication infrastructure: hardwired Ethernet preferred for SCADA integration, cellular or fiber optic alternatives for remote substations. Identify nearest lightning protection earth grid connection point for DGA cabinet grounding—maximum 5 ohms resistance required per IEC 61000-5-2.
Phase 2: Sampling Valve Installation and Leak Testing
For offline installation, drain transformer oil to 300mm below the sampling point. Clean the installation area with acetone or approved degreaser, then mark the valve center point. Drill pilot hole using 6mm carbide bit, verify wall thickness using ultrasonic gauge (record measurement for documentation), then enlarge to final diameter matching valve thread size. Tap threads carefully to avoid metal chips entering the tank—use grease on tap flutes to capture debris.
Apply PTFE thread sealant or anaerobic pipe sealant rated for transformer oil compatibility (verify manufacturer compatibility certificate). Install sampling valve hand-tight plus 1.5 turns using appropriate torque wrench: 40-60 N⋅m for DN15, 60-90 N⋅m for DN20, 90-120 N⋅m for DN25 connections. For hot-tap installation, follow equipment manufacturer procedures exactly—deviations risk oil leakage or air ingress.
Perform initial leak test by re-filling transformer oil to operating level and pressurizing to 1.2× normal operating pressure using nitrogen injection through the conservator. Apply soap solution to all valve connections and observe for 15 minutes—any bubble formation indicates leak requiring re-work. Record test pressure, duration, and result in installation documentation.
Phase 3: Sampling Line Routing and Heat Tracing Installation
Route stainless steel tubing from transformer sampling valve to DGA cabinet inlet following these principles: (1) continuous 1:100 minimum slope toward DGA prevents gas bubble accumulation, (2) minimize bends—use gentle 300mm radius bends rather than sharp 90° fittings that create turbulence, (3) maintain 50mm minimum clearance from high-voltage bushings and live conductors, (4) support tubing every 1.5-2 meters using vibration-isolating clamps that prevent work-hardening from transformer hum.
For ambient temperatures below 10°C, install self-regulating heat tracing cable along the entire sampling line length. Secure heat trace using aluminum foil tape every 300mm, maintaining direct contact with tubing surface. Wrap thermal insulation (minimum 25mm fiberglass or elastomeric foam) over the heat-traced tubing, then seal with UV-resistant jacket. Connect heat trace power to thermostatic controller set to activate below 5°C oil temperature—prevents unnecessary energy consumption during warm periods.
| Installation Step | Quality Checkpoint | Acceptance Criteria | Tools Required |
|---|---|---|---|
| Valve installation | Torque verification, leak test | Specified torque ±5%, zero leaks at 1.2× pressure for 15 min | Calibrated torque wrench, pressure gauge, soap solution |
| Tubing slope | Digital level measurement | 1:100 minimum slope continuous to DGA, no sags or high points | Digital inclinometer, laser level |
| Flow system assembly | Pressure drop test | <50 kPa pressure drop at 500 ml/min flow rate | Test pump, differential pressure gauge |
| Electrical connections | Insulation resistance, polarity | >10 MΩ at 500VDC, correct phase/neutral/ground | Megohmmeter, multimeter |
| Communication links | Data transmission test | Modbus/IEC 61850 registers readable, <2% packet loss | Protocol analyzer, network tester |
| System purging | Moisture content verification | <50 ppm water in purge oil sample | Karl Fischer titrator |
Phase 4: DGA Analyzer Mounting and Cabinet Preparation
Install DGA cabinet on level concrete foundation or structural steel mounting frame capable of supporting 150-200 kg loaded weight. Position cabinet to allow 600mm clearance on the front access door side and 300mm on remaining sides for ventilation and maintenance access. For outdoor installations, verify cabinet orientation places cable entry glands on the bottom to prevent rain water ingress along cables.
Mount analyzer module inside cabinet per manufacturer specifications—typically requires four M8 bolts torqued to 15-20 N⋅m into captive mounting points. Connect sampling inlet and outlet tubing to analyzer using compression fittings or flared connections as specified. Install flow meter, pressure sensors, and temperature sensors in series with the analyzer following the order: isolation valve → filter → flow meter → pressure sensor → temperature sensor → analyzer inlet → analyzer outlet → return line.
Phase 5: Nitrogen Purging and Oil Filling Procedure
Before introducing transformer oil, purge the complete sampling system with dry nitrogen to remove air and moisture. Connect nitrogen cylinder (99.9% purity minimum) equipped with pressure regulator to the sampling line at the transformer valve. Set regulator to 50 kPa (7 psi) and slowly open valves while monitoring pressure at the DGA outlet. Continue nitrogen flow for 15 minutes or until moisture detector indicates <50 ppm (use portable hygrometer or dew point meter).
Close the nitrogen supply and verify system holds 40 kPa pressure for 10 minutes—pressure drop indicates leak requiring identification and repair. After successful pressure hold test, slowly open the transformer sampling valve allowing oil to displace nitrogen through the DGA system. Maintain flow below 100 ml/min during initial filling to prevent air bubble entrainment. Collect first 500ml of oil discharge in a clean container for visual inspection and moisture testing—discard if moisture content exceeds transformer oil specification.
Phase 6: Flow Rate Calibration and System Commissioning
With oil circulation established, adjust flow control valve or sampling pump speed to achieve target flow rate (typically 250-350 ml/min for power transformers). Verify flow meter reading matches actual flow by collecting discharged oil in a graduated cylinder for precisely 1 minute—measured volume should match flow meter indication within ±5%. If deviation exceeds tolerance, recalibrate flow meter using manufacturer procedure or install correction factor in DGA software.
Monitor oil circulation for 2-4 hours while recording flow rate, pressure, and temperature every 15 minutes. Flow rate should remain stable within ±10% indicating proper hydraulic balance. Increasing pressure suggests filter clogging requiring element replacement; decreasing pressure indicates valve restriction or pump wear. Temperature should stabilize at transformer oil temperature ±3°C—larger deviations indicate inadequate heat tracing or excessive heat loss in long sampling lines.
Phase 7: DGA Analyzer Calibration and Baseline Measurement
Perform initial DGA calibration using certified gas standards: hydrogen, carbon monoxide, carbon dioxide, methane, ethylene, ethane, and acetylene each at 2-3 concentration levels spanning the expected measurement range (typically 1-5000 ppm for each gas). Calibration gas cylinders must have certificate of analysis traceable to national standards with maximum 12-month age.
Inject calibration gas following manufacturer protocol—typically requires 5-10 minute purge at each concentration level followed by three consecutive measurements with <5% variance between readings. Document all calibration data including gas cylinder serial numbers, ambient temperature and pressure, and analyzer response values. Compare measured sensitivity with factory calibration specifications—deviation exceeding ±10% requires analyzer service before proceeding.
After calibration validation, initiate baseline measurement by collecting 24 hours of continuous DGA data from the transformer. Baseline gas concentrations establish the transformer’s normal operating signature and reference for future trending. Typical baseline values for healthy transformers: H₂ <100 ppm, CH₄ <50 ppm, C₂H₄ <50 ppm, C₂H₆ <30 ppm, C₂H₂ <3 ppm, CO <500 ppm, CO₂ <5000 ppm. Concentrations significantly exceeding these levels require investigation before proceeding to normal operation mode.
Phase 8: SCADA Integration and Alarm Configuration
Configure communication interface between DGA system and substation SCADA using Modbus RTU/TCP, IEC 61850, DNP3, or manufacturer-specific protocol. Map DGA data registers to SCADA database including gas concentrations (ppm), total dissolved combustible gas (TDCG), calculated fault indices (Duval Triangle, Rogers Ratios, Key Gas analysis), flow rate, pressure, temperature, and system status alarms.
Establish four-tier alarm thresholds based on IEEE C57.104 and CIGRE recommendations: (1) Normal operation—routine monitoring with daily trend reports, (2) Investigation recommended—gas rate-of-rise exceeds 10% per day or absolute concentration reaches 70% of alarm level, (3) Action required—gas exceeds IEEE normal limits triggering within 4-hour operator response, (4) Emergency—gas concentrations indicate active high-energy fault requiring immediate load reduction or transformer disconnection.
Post-Installation Verification Checklist:
- All valve connections leak-free at operating pressure for 24 hours
- Oil flow rate stable at 250-350 ml/min ±10% over 4-hour test
- DGA calibration accuracy ±10% for all seven fault gases
- SCADA communication verified with <2% data packet loss over 24 hours
- Baseline gas measurements within IEEE C57.104 normal limits
- All alarm thresholds tested and verified through system simulation
- Heat tracing activates below 5°C and maintains oil fluidity
- Complete installation documentation including as-built drawings, test records, calibration certificates
What Are the Key Components in a DGA Installation?
A complete DGA installation comprises fourteen essential subsystems working in coordinated operation: sampling valve assembly, sampling line network, flow regulation system, filtration equipment, gas extraction module, analytical measurement unit, data processing electronics, communication interface, power supply system, environmental control, calibration gas storage, oil return pathway, safety interlocks, and monitoring instrumentation. Each component requires proper specification, installation, and integration to achieve reliable long-term performance.
Sampling Valve Assembly and Tank Penetration Hardware
The sampling valve serves as the primary interface between transformer tank oil and the DGA system, requiring materials compatible with hot transformer oil (up to 105°C), resistance to oxidation products, and long-term seal integrity under thermal cycling. High-quality installations use stainless steel ball valves (AISI 316L or equivalent) with PTFE/graphite composite seats rated for 150°C service temperature and 1.0 MPa pressure rating—significantly exceeding normal operating conditions to ensure safety margin.
The valve assembly incorporates three critical features: (1) full-port bore design maintaining constant flow diameter preventing turbulence and gas bubble formation, (2) double-seal stem packing with live-loaded compression maintaining seal integrity despite thermal expansion, (3) lockable handle preventing accidental closure during operation. For LTC compartments where arcing generates significant acetylene, install explosion-proof valves meeting ATEX or IECEx certification preventing spark ignition of explosive gas mixtures.
Tank penetration hardware varies by installation method. Welded nozzle installations provide optimal mechanical strength—a flanged nozzle (DN25 typical) welds to the tank wall using qualified welders following ASME Section IX or equivalent national welding code. The nozzle extends 50-100mm from tank surface allowing proper valve mounting clearance. Non-welded installations use threaded penetrations: NPT threads for North American installations, BSP threads for European/Asian projects, both requiring liquid thread sealant rated for transformer oil service.
Sampling Line Design: Materials, Sizing, and Routing
Sampling line construction uses seamless stainless steel tubing (ASTM A269 TP316L) with precise dimensional tolerances ensuring consistent flow characteristics and resistance to transformer oil degradation. Tubing outer diameter ranges from 6mm (1/4″) for short runs under 5 meters to 12mm (1/2″) for distances exceeding 20 meters, with wall thickness 0.9-1.2mm providing adequate mechanical strength while minimizing thermal mass.
The sampling line must maintain continuous downward slope of 1:100 (1cm drop per meter length) from transformer valve to DGA inlet preventing gas bubble accumulation that creates false high readings. Calculate required slope using transformer valve height and horizontal distance: for a valve at 2.5m elevation with DGA at ground level 15m away, minimum height difference = 15m × 0.01 = 0.15m, providing 2.35m available for 2.5m required—installation feasible. If natural slope is insufficient, relocate DGA cabinet closer to transformer or use sampling pump to force oil through upward sections.
Tube connections employ compression fittings (Swagelok or equivalent) providing leak-free joints withstanding pressure transients and thermal cycling. Each joint requires proper assembly procedure: slide ferrule and nut onto tubing, insert into fitting body to marked depth (typically 20mm), hand-tighten nut, then wrench-tighten 1-1/4 turns while holding fitting body stationary. Over-tightening damages ferrule and causes leaks; under-tightening allows vibration-induced loosening. Pressure test each joint to 1.5× maximum operating pressure before insulation installation.
| Component | Specification | Function | Failure Mode & Impact |
|---|---|---|---|
| Sampling valve | SS316L ball valve, DN15-25, full port, 1.0 MPa rating | Isolate transformer from DGA, manual flow control | Seat wear → oil leakage; handle freeze → service interruption |
| Sampling tubing | SS316L seamless, 6-12mm OD, 1:100 slope minimum | Transport oil from tank to analyzer maintaining gas saturation | Gas bubble accumulation → false high readings; corrosion → contamination |
| Flow meter | Turbine or ultrasonic, 50-500 ml/min range, ±2% accuracy | Monitor oil circulation rate, detect pump/valve failures | Bearing wear → erratic readings; electrical fault → no flow indication |
| Particulate filter | 10 μm stainless mesh, 0.5 MPa rating, 500 ml/min capacity | Remove carbon, metal particles, sludge protecting analyzer | Clogging → pressure increase, flow reduction; bypass → sensor contamination |
| Membrane degasser | Polypropylene hollow fiber, 0.01-0.1 μm pore, 5 m² area | Extract dissolved gas from oil into vacuum chamber | Membrane fouling → reduced gas extraction efficiency; rupture → oil ingress to analyzer |
| Gas analyzer | GC or photoacoustic, 7-gas measurement, 0.1-10,000 ppm range | Quantify dissolved gas concentrations indicating faults | Detector drift → calibration error; column degradation → gas coelution |
| Vacuum pump | Diaphragm type, 2-5 L/min, 50-80 kPa vacuum, oil-free | Create negative pressure extracting gas through membrane | Diaphragm fatigue → vacuum loss; motor failure → no gas extraction |
| Temperature sensor | RTD Pt100, Class A, -50 to +150°C, 4-wire connection | Measure oil temperature for gas solubility correction | Sensor drift → incorrect temperature compensation; cable damage → no reading |
| Pressure transducer | Piezo or strain gauge, 0-1 MPa, ±0.5% FS accuracy | Monitor sampling pressure, detect blockages/leaks | Diaphragm rupture → pressure reading stuck; electrical noise → erratic data |
Filtration System and Oil Conditioning Equipment
Particulate contamination in transformer oil—carbon from arc degradation, copper from winding corrosion, cellulose fibers from insulation breakdown—damages DGA analyzer sensors, clogs flow passages, and generates spurious gas readings. Multi-stage filtration removes particles before oil enters the sensitive analytical components while maintaining adequate flow rate for timely fault detection.
Primary filtration uses 100-micron stainless steel mesh screen positioned immediately after the sampling valve, capturing large debris and protecting downstream components. This coarse filter requires quarterly inspection and cleaning by backflushing with filtered oil or ultrasonic cleaning in solvent bath. Secondary filtration employs 10-micron pleated membrane cartridge (polypropylene or PTFE) installed before the flow meter providing fine particle removal. Replace secondary filter annually or when differential pressure exceeds 100 kPa indicating clogging.
For transformers with known contamination history—legacy units predating modern oil processing standards or transformers exposed to moisture ingress—install tertiary filtration using 3-micron absolute-rated element before the degassing membrane. This ultra-fine filtration prevents membrane pore blockage that reduces gas extraction efficiency. Monitor filter differential pressure continuously; rising pressure indicates contamination load requiring accelerated replacement interval.
Gas Extraction System: Membrane Degassers and Vacuum Technology
The gas extraction module separates dissolved gases from transformer oil using semi-permeable membrane technology based on Henry’s Law: gas solubility decreases with reduced pressure, causing dissolved gases to evolve from solution and permeate through the membrane into a vacuum chamber. Modern DGA systems employ microporous polypropylene hollow fiber membranes with 0.01-0.1 μm pore diameter allowing gas molecules to pass while blocking liquid oil.
A typical membrane degasser contains 50-200 hollow fibers bundled in a cylindrical housing, providing 3-10 m² of gas-permeable surface area. Oil flows through the fiber interiors at 200-400 ml/min while vacuum (50-80 kPa below atmospheric) applied to the fiber exteriors draws dissolved gases through the membrane walls. Extracted gas mixture flows to the analytical measurement system for composition analysis.
Vacuum generation uses oil-free diaphragm pumps avoiding contamination from pump lubricant vapors that interfere with gas chromatography measurements. The vacuum pump operates continuously during analysis cycles (typically 20-30 minutes per measurement) and idles between cycles to conserve energy. Pump diaphragms require replacement every 2-3 years based on 8760 hours annual operation; premature failure indicates membrane leak allowing oil penetration into the vacuum system.
Gas extraction efficiency = (C_gas / C_oil) × 100%, where C_gas is measured gas concentration in the vacuum chamber and C_oil is actual dissolved concentration in the oil sample. Efficient systems achieve >95% extraction for hydrogen, methane, ethylene, ethane (high diffusion rate gases) and >85% for acetylene, carbon monoxide (moderate diffusion). Low efficiency (<70%) indicates membrane fouling requiring replacement or inadequate vacuum pump performance requiring service.
Analytical Measurement Technologies: GC vs. Photoacoustic vs. Electrochemical
Gas chromatography (GC) serves as the reference standard for DGA analysis, separating gas mixtures into individual components using a packed or capillary column followed by thermal conductivity detection (TCD) or flame ionization detection (FID). The extracted gas sample flows through a heated column (typically 60-80°C) containing stationary phase material that retards different gases based on molecular properties. Separation time ranges from 3-10 minutes depending on column length and temperature programming.
GC advantages include high accuracy (±3% of reading), excellent selectivity (clearly distinguishes C₂H₂ from C₂H₄ despite similar molecular weights), and long-term stability with annual calibration. Disadvantages encompass higher cost ($15,000-$40,000), carrier gas requirements (hydrogen, helium, or nitrogen cylinders requiring periodic replacement), and maintenance complexity requiring trained technicians for column replacement and detector cleaning.
Photoacoustic spectroscopy (PAS) measures gas concentration by detecting acoustic pressure waves generated when gas molecules absorb modulated infrared light. Each gas species absorbs specific IR wavelengths; measuring absorption at characteristic frequencies identifies and quantifies individual gases. PAS systems provide faster measurement cycles (5-15 minutes), simpler maintenance (no consumable carrier gas or column replacement), and lower cost ($8,000-$20,000) but reduced accuracy (±5-8% of reading) and potential interference from moisture or oil vapor contamination.
Electrochemical sensors detect gas concentrations through oxidation-reduction reactions at electrode surfaces, offering lowest cost ($3,000-$8,000) and smallest footprint but limited to hydrogen and oxygen measurement—insufficient for comprehensive fault diagnosis requiring full seven-gas analysis. Electrochemical systems suit distribution transformers where hydrogen monitoring alone provides adequate fault indication, with full DGA analysis performed by laboratory testing when hydrogen exceeds alarm thresholds.
| Technology | Measurement Principle | Typical Accuracy | Cost Range | Best Application |
|---|---|---|---|---|
| Gas Chromatography | Column separation + thermal conductivity detection | ±3% of reading | $15,000-$40,000 | Power transformers >25 MVA, critical substations, generator step-up |
| Photoacoustic Spectroscopy | IR absorption + acoustic pressure detection | ±5-8% of reading | $8,000-$20,000 | Distribution transformers, medium-voltage networks, budget constraints |
| Electrochemical Sensor | Oxidation-reduction at electrode surface | ±10-15% of reading | $3,000-$8,000 | H₂ monitoring only, pole-mounted transformers, remote locations |
| Tunable Diode Laser (TDLAS) | Laser absorption spectroscopy at specific wavelengths | ±2-4% of reading | $20,000-$50,000 | Research applications, ultra-high accuracy requirements, fast response |
Data Acquisition and Processing Electronics
The DGA system’s embedded controller manages measurement sequencing, data acquisition from multiple sensors, real-time fault diagnosis algorithms, alarm generation, and communication with external systems. Modern controllers employ industrial-grade microprocessors (ARM Cortex or equivalent) with 256MB-1GB RAM, 4-16GB solid-state storage, and wide temperature operation (-40°C to +70°C) ensuring reliable operation in outdoor substation environments.
Analog-to-digital converters (ADC) digitize sensor signals with 16-24 bit resolution providing 0.0015%-0.00006% quantization error—critical for detecting subtle gas concentration changes indicating incipient faults. Sampling rates of 10-1000 samples/second allow averaging to reduce electrical noise while maintaining adequate temporal resolution for rapid fault detection. Digital signal processing includes Kalman filtering for flow measurement, exponential smoothing for temperature compensation, and multivariate regression for gas solubility correction.
Onboard data storage retains 1-5 years of historical DGA measurements at hourly resolution, supporting long-term trend analysis and post-fault forensic investigation. Industrial SD cards or eMMC flash memory provide reliable storage surviving 100,000+ write cycles and operating across -40°C to +85°C temperature range. Automated data backup to remote SCADA servers or cloud platforms ensures data preservation despite local controller failure or natural disaster damage.
Communication Interfaces and SCADA Integration Protocols
DGA systems integrate with substation automation using multiple communication protocols accommodating different utility SCADA architectures. Modbus RTU over RS-485 serial links provides robust long-distance communication (up to 1200 meters) resistant to electrical noise, suitable for retrofitting legacy substations. Configure Modbus as master-slave architecture with DGA as slave responding to periodic polling from remote terminal unit (RTU) or programmable logic controller (PLC) master devices.
Modern installations increasingly deploy Ethernet-based protocols: Modbus TCP/IP offers seamless migration from serial Modbus with enhanced bandwidth supporting faster data updates and simultaneous multi-client access. IEC 61850 provides standardized object models for power system equipment, enabling interoperability between multi-vendor systems and supporting advanced GOOSE messaging for peer-to-peer communication between intelligent electronic devices (IEDs). DNP3 protocol serves utilities requiring secure, authenticated communications with built-in time-synchronization for event sequence-of-events recording.
Wireless communication options include cellular (4G LTE/5G) for remote transformers lacking fiber optic or hardwired connections, providing reliable connectivity with 99.5%+ availability in urban areas. Industrial WiFi (IEEE 802.11n/ac/ax) suits substations with existing wireless infrastructure, though outdoor installations require weatherproof antennas, high-power access points overcoming RF path loss, and encryption (WPA3 or 802.1X) preventing unauthorized access. Satellite communication remains viable for extremely remote locations but higher latency (500-800ms) limits real-time control applications.
🌏 Vietnam Case Study: Northern Power Corporation 500kV Backbone Network
Location: Hanoi-Hai Phong corridor, Northern Vietnam
Installation: March-November 2024 – 12 units on 500kV/220kV transformers (300-450 MVA)
Challenge: Multi-vendor SCADA environment (ABB, Siemens, Schneider Electric RTUs), requirement for simultaneous data reporting to three control centers (National Load Dispatch Center, Regional Control Center, Substation Local Control), monsoon flooding affecting outdoor communication cabinets, limited cellular coverage in mountainous sections
Solution: Fjinno DGA with triple-redundant communication: (1) Primary: IEC 61850 over fiber optic ring to substation automation system, (2) Secondary: Modbus TCP via cellular 4G backup with automatic failover, (3) Tertiary: Modbus RTU RS-485 to local HMI for maintenance access. DGA cabinets elevated 1.5m above historic flood levels with IP66-rated cable glands.
Result: Achieved 99.97% data availability during first 6 months operation including severe September 2024 typhoon with 400mm rainfall in 24 hours. IEC 61850 GOOSE messaging enabled automatic load shedding when DGA detected acetylene spike at Pha Lai substation (400+ ppm in 30 minutes)—transformer disconnected within 90 seconds preventing catastrophic failure. Communication failover to cellular occurred twice during fiber cuts; average restoration time 45 minutes with zero data loss via store-and-forward buffering.
What Are Common Installation Challenges and Solutions?
DGA installation encounters twelve recurring technical and logistical challenges that impact project schedule, cost, and long-term system reliability. Successful installations anticipate these obstacles during planning phases and implement proven mitigation strategies drawn from thousands of global deployments across diverse transformer types, climate zones, and utility operational practices.
Challenge 1: Limited Physical Access to Transformer Tanks
Space-constrained substations in urban areas often position transformers with minimal clearance to building walls, adjacent equipment, or property boundaries. Installing DGA sampling valves and routing tubing becomes difficult when transformer sides face obstacles within 500mm distance. Indoor substations exacerbate this challenge with overhead cable trays, ventilation ductwork, and structural columns obstructing access.
Solution: Conduct 3D laser scanning of transformer and surrounding area during site survey, generating point cloud models identifying access paths. Use compact sampling valve designs with 90° elbow configurations allowing vertical mounting on top surfaces or radiator headers where horizontal tank sides are inaccessible. For extreme cases, specify flexible stainless steel braided hose (DN6-DN10) for the first 1-2 meters allowing routing around obstacles before transitioning to rigid tubing—verify hose specification includes minimum bend radius (typically 50-75mm) to prevent flow restriction.
Challenge 2: Extreme Ambient Temperatures Affecting Analyzer Performance
Gas chromatography analyzers require stable operating temperature (15-35°C) for accurate measurements, yet substations in tropical Southeast Asia experience 40-45°C daily peaks while Middle Eastern installations face 50°C+ extremes. Conversely, high-altitude or northern latitude sites encounter -30°C to -40°C winter conditions freezing oil in sampling lines despite heat tracing.
Solution: Specify analyzer cabinets with integrated thermal management: air conditioning for hot climates maintaining 20-25°C internal temperature regardless of 50°C external conditions (requires 500-1500W cooling capacity depending on cabinet size and solar radiation exposure). For cold climates, use cabinet heaters (150-300W) with thermostatic control maintaining 15°C minimum. Install thermal insulation (50mm minimum thickness, λ ≤ 0.04 W/m·K) on all six cabinet surfaces plus weatherproof external cladding reflecting solar radiation in hot climates (white or aluminum finish reducing absorption).
For sampling lines, increase heat trace power density in extreme cold: standard 10 W/m self-regulating cable suits -10°C to +5°C operation, but -30°C environments require 20-30 W/m mineral-insulated (MI) cable with thermostat limiting maximum temperature to 85°C preventing oil degradation. Wrap sampling line with dual-layer insulation (inner 25mm closed-cell elastomeric foam, outer 25mm fiberglass) and seal all joints with aluminum foil tape preventing moisture condensation within insulation voids.
Challenge 3: High Humidity and Moisture Contamination
Tropical and coastal regions maintain 80-100% relative humidity year-round, promoting condensation on cold surfaces, corrosion of electronics, and moisture ingress into oil samples that alters gas solubility calculations. Moisture in carrier gas cylinders or vacuum pumps interferes with gas chromatography measurements causing baseline drift and peak distortion.
Solution: Install desiccant breathers on analyzer enclosures maintaining <40% internal humidity despite 95% external conditions—use indicating silica gel allowing visual inspection of desiccant saturation (blue = active, pink = exhausted). Replace desiccant every 3-6 months in high-humidity locations. For GC systems using hydrogen carrier gas, install molecular sieve purifier removing water vapor to <1 ppm preventing TCD baseline noise. Specify vacuum pumps with vapor-phase moisture separator: a Peltier cooler condenses water vapor from extracted gas before entering the analytical chamber, with condensate draining to a collection vessel.
Seal all electrical penetrations with IP66-rated cable glands using compression sealing against cable jackets, not insulation cores. Apply conformal coating to printed circuit boards protecting against moisture-induced corrosion—acrylic or polyurethane coatings provide 50-100μm barrier while allowing component rework. Install silica gel packets inside junction boxes and terminal enclosures for additional moisture control.
Challenge 4: Electrical Noise Interference from High-Voltage Equipment
Transformers, circuit breakers, and disconnect switches generate intense electromagnetic fields during operation and switching transients, inducing voltage spikes on signal cables that corrupt DGA measurements. Substations with poor grounding or ground potential rise during faults create common-mode noise on low-voltage sensor circuits.
Solution: Route DGA signal cables (flow meter, pressure sensor, temperature sensor) in grounded metal conduit or armored cable providing 40-60 dB electromagnetic shielding. Maintain minimum 300mm separation from power cables; where crossing is unavoidable, cross at 90° angle minimizing magnetic coupling. Use shielded twisted-pair cable for all analog signals with shield grounded at one end only (analyzer end) preventing ground loop currents.
Implement galvanic isolation on all field inputs: 4-20mA sensor signals pass through optical isolators providing 2.5kV+ isolation voltage preventing ground potential differences from damaging electronics. Power the DGA system from isolated transformer or uninterruptible power supply (UPS) with galvanic isolation from substation ground—this breaks ground loops while maintaining safety ground connection through separate earth electrode. Install surge protection devices (SPD) on AC power input (Type 2 SPD, 40kA surge current rating) and communication lines (Type 3 SPD customized for Ethernet, RS-485, or fiber optic interfaces).
| Challenge | Impact on DGA | Solution | Implementation Cost |
|---|---|---|---|
| Physical access limitation | Inability to install sampling valve at optimal thermal location | Flexible hose routing, remote mounting, 3D path planning | +$500-$1,500 per installation |
| Extreme temperature (+50°C or -30°C) | Analyzer malfunction, oil viscosity changes, inaccurate measurements | Climate-controlled cabinet, enhanced heat tracing, insulation | +$2,000-$5,000 for HVAC |
| High humidity (>80% RH) | Moisture interference with GC, electronics corrosion, condensation | Desiccant breathers, conformal coating, vapor separator | +$300-$800 materials |
| Electromagnetic interference | Signal noise, false alarms, communication errors | Shielded cables, galvanic isolation, surge protection | +$400-$1,200 per system |
| Contaminated transformer oil | Filter clogging, membrane fouling, reduced gas extraction | Multi-stage filtration, 3μm tertiary filter, quarterly maintenance | +$200-$500 annual consumables |
| Vibration from transformer hum | Tubing fatigue cracking, fitting loosening, flow meter errors | Vibration isolators, flexible sections, rigid mounting | +$150-$400 materials |
| Lightning and surge damage | Electronics destruction, communication failure, power supply burnout | Multi-stage SPD, fiber optic isolation, UPS with surge suppression | +$800-$2,500 protection |
| Calibration gas logistics | Expired standards, gas cylinder transportation in remote areas | Synthetic gas generator, extended shelf-life cylinders, local supply contracts | +$2,000-$8,000 generator |
Challenge 5: Managing Very Long Sampling Line Distances
Large power station transformers or gas-insulated substation (GIS) installations may require 30-50 meter sampling line runs from transformer vault to control building where DGA analyzers install for climate protection and security. Long sampling lines increase pressure drop, thermal losses, and gas diffusion time from fault source to measurement—degrading rapid fault detection capability.
Solution: Implement forced-circulation sampling using peristaltic pump or gear pump installed at the DGA inlet pulling oil through the sampling line at 400-600 ml/min—higher than natural gravity flow. Pumping overcomes pressure drop allowing smaller tubing diameter (6mm vs. 10mm) reducing material cost and thermal mass. Select pump materials compatible with transformer oil: PTFE or Viton diaphragms for peristaltic pumps, stainless steel gears for gear pumps.
For distances exceeding 30 meters, consider installing the DGA analyzer closer to the transformer in a dedicated outdoor enclosure rather than attempting extremely long sampling lines. Compare lifecycle costs: a climate-controlled outdoor cabinet with 10m sampling line versus 50m sampling line to existing building—the outdoor enclosure often proves more economical when factoring reduced tubing cost, simpler heat tracing, and faster fault detection improving transformer protection.
Challenge 6: Integrating DGA with Legacy SCADA Systems
Utilities operating aging SCADA infrastructure (20-30 years old) encounter protocol incompatibility when modern DGA systems support only IEC 61850 or Modbus TCP while legacy RTUs communicate via proprietary serial protocols, DNP3 Level 1, or obsolete standards like IEC 60870-5-101. Direct integration becomes impossible without costly SCADA upgrade.
Solution: Deploy protocol converter gateways translating between modern DGA protocols and legacy SCADA formats. These industrial computers run protocol conversion software mapping IEC 61850 data objects to DNP3 points or Modbus registers to proprietary protocol frames. Cost-effective converters range $500-$2,000 supporting 2-8 simultaneous protocol conversions with 100+ ms latency—acceptable for DGA applications where measurement updates occur every 15-60 minutes.
Alternatively, implement parallel monitoring where DGA data flows to both legacy SCADA and modern asset management systems (historian, asset health center, cloud analytics platform). This dual-path approach allows immediate DGA deployment while long-term SCADA modernization proceeds independently—avoiding project delays waiting for substation automation upgrades spanning multiple budget cycles.
What Is the Step-by-Step DGA Installation Process?
A systematic installation methodology ensures DGA systems achieve design performance specifications while minimizing transformer downtime, maintaining safety during energized equipment work, and producing documentation supporting future maintenance. The complete installation process spans twelve sequential phases from initial site assessment through final commissioning and performance verification testing.
Phase 1: Pre-Installation Site Survey and Risk Assessment (Week -4 to -2)
Conduct comprehensive site inspection documenting transformer nameplate data, existing monitoring equipment, available mounting locations, power sources, and communication infrastructure. Photograph transformer from all four sides plus top view, measuring distances between potential sampling valve locations and proposed DGA cabinet position. Record ambient conditions including temperature range (obtain 12-month historical data from meteorological station), humidity levels, dust/pollution severity (IEC 60815 classification), and seismic zone designation.
Safety assessment identifies hazards requiring mitigation: energized high-voltage conductors within 3-meter approach boundary, confined space entry for oil sampling, arc flash hazards from adjacent switchgear (calculate incident energy using IEEE 1584 method), and fall hazards when accessing transformer top surfaces requiring scaffolding or mobile elevated work platforms. Prepare Job Safety Analysis (JSA) or Risk Assessment Method Statement (RAMS) documenting identified hazards and control measures—obtain approval from site safety officer before commencing work.
Verify transformer oil sampling valve accessibility during site survey. Many transformers include factory-installed sampling valves (typically DN15-DN20) located on tank sides or radiator headers intended for periodic manual sampling. If existing valves are suitable (proper elevation, unobstructed access, compatible with DGA connection), DGA installation requires only tubing installation from existing valve to analyzer—avoiding tank penetration welding. If no suitable valve exists, plan new valve installation including hot-tap welding procedure or transformer de-energization for weld installation.
✓ Transformer nameplate documentation (voltage, MVA, oil volume, manufacturer, year)
✓ Single-line diagram showing transformer connections and protection
✓ Existing DGA data or laboratory oil test reports (last 3 years minimum)
✓ Ambient temperature: annual min/max, daily variation, historical extremes
✓ Relative humidity: seasonal averages, maximum recorded values
✓ Available AC power source: voltage (110/220/380V), frequency, maximum available current
✓ Communication options: fiber optic, Ethernet, RS-485, cellular coverage strength
✓ SCADA protocols: Modbus RTU/TCP, IEC 61850, DNP3 version and parameters
✓ Mounting location: foundation/wall strength, drainage, cable routing path
✓ Sampling valve location: existing valve survey, new valve installation feasibility
✓ Sampling line routing: length, elevation change, obstacle clearance
✓ Heat tracing requirements: minimum ambient temperature, power availability
✓ Calibration gas availability: supplier location, delivery lead time, cylinder storage
✓ Site access restrictions: working hours, security clearance, permit requirements
✓ Transformer outage schedule: planned maintenance windows, emergency procedures
✓ Environmental permits: hot work, confined space, chemical handling
✓ Arc flash hazard analysis: incident energy, PPE requirements, restricted approach boundary
✓ Fall protection: working at height >2m, guardrails, personal fall arrest systems
✓ Lifting equipment: crane capacity for analyzer cabinet (typically 100-300 kg)
✓ Welding requirements: qualified welder certification, welding procedure specification
✓ Special tools: torque wrenches (5-50 N·m), tube bending equipment, vacuum pump
✓ Testing equipment: pressure gauge (0-1 MPa), multimeter, insulation tester
✓ Spare parts inventory: filters, membrane modules, O-rings, fittings
✓ Documentation requirements: as-built drawings, test reports, O&M manuals
✓ Training needs: operations staff, maintenance technicians, engineering personnel
Phase 2: Material Procurement and Factory Testing (Week -4 to -1)
Order DGA analyzer and ancillary components with 6-8 week lead time for standard configurations, 10-14 weeks for custom specifications (explosion-proof enclosures, exotic climate ratings, specialized communication protocols). Specify delivery to include factory acceptance test (FAT) witnessed by customer representatives or third-party inspectors verifying performance before shipment to installation site.
Factory acceptance testing validates DGA accuracy using NIST-traceable calibration gas standards spanning the measurement range: hydrogen (10-5000 ppm), methane (5-1000 ppm), ethane (5-1000 ppm), ethylene (5-1000 ppm), acetylene (1-500 ppm), carbon monoxide (50-2000 ppm), carbon dioxide (100-10,000 ppm). Each gas concentration tested at minimum three levels (low-mid-high range) with triplicate measurements demonstrating repeatability within ±5% relative standard deviation. Document FAT results in formal test report signed by manufacturer quality manager and customer witness.
Procure installation materials in parallel: stainless steel tubing (order 20% excess length for routing adjustments), compression fittings (order 30% spare parts for damaged units during installation), heat trace cable (match total sampling line length), thermal insulation (calculate surface area plus 15% waste allowance), and electrical cables for power and communication (include spare conductors for future expansion). Verify all materials arrive with mill test certificates, material safety data sheets (MSDS), and country-specific regulatory compliance markings (CE for Europe, UL for North America, CCC for China).
Phase 3: Foundation and Cabinet Installation (Week 1, Days 1-2)
Prepare mounting foundation for DGA analyzer cabinet ensuring level surface within ±5mm over cabinet footprint, adequate load-bearing capacity (typically 200-400 kg distributed load including equipment, accessories, and service personnel), and proper drainage preventing water accumulation around cabinet base. Concrete pad foundation (minimum 150mm thickness, C25/30 strength grade) provides optimal stability; pour concrete minimum 7 days before equipment installation allowing adequate curing strength.
For installations on existing concrete surfaces, verify flatness and install leveling shims (stainless steel plate, 3-10mm thickness) under cabinet mounting feet correcting surface irregularities. Bolt cabinet to foundation using M12-M16 expansion anchors (stainless steel 316L, minimum 80mm embedment depth) torqued to manufacturer specification (typically 60-100 N·m). Install flexible conduit boots where cables enter cabinet preventing moisture and insect ingress while accommodating cabinet vibration.
Orient cabinet to minimize solar heat load on doors and ventilation openings: in Northern Hemisphere sites above 30° latitude, face doors toward north; in tropical sites near equator, face doors toward prevailing wind direction maximizing natural ventilation. Install sunshade canopy above cabinet (minimum 400mm overhang on all sides) constructed from aluminum angle frame with white-painted steel sheet roof reflecting solar radiation and providing rain protection during service access with doors open.
Phase 4: Sampling Valve Installation on Transformer Tank (Week 1, Days 2-3)
Sampling valve installation method depends on whether transformer operates energized or de-energized during installation. For energized transformer installations, use hot-tap welding procedure allowing valve attachment without draining oil or interrupting service. Hot-tap method employs a specialized fitting welded to tank surface while transformer remains in operation, followed by drilling through tank wall under pressurized conditions, then installing valve through the fitting—entire process maintains oil containment preventing leakage.
Hot-tap installation procedure: (1) Clean and grind tank surface removing paint, rust, and oxidation to expose bare metal (100mm diameter minimum). (2) Weld flanged nozzle to tank using qualified welder following ASME B31.3 or equivalent code—typical nozzle: DN25 150# RF flange, carbon steel A105, 80mm length. (3) Bolt hot-tap machine to nozzle flange with gate valve in closed position. (4) Drill through tank wall using hole saw matching valve port diameter (typically 20mm), allowing oil to fill hot-tap chamber. (5) Retract hole saw, close gate valve, remove hot-tap machine. (6) Install sampling valve (ball valve SS316L DN20) to nozzle flange using spiral-wound gasket and stud bolts torqued to 60-80 N·m in star pattern.
For de-energized transformer installations, drain oil level below proposed valve location, weld nozzle directly to tank following standard welding procedures, pressure test weld (1.5× operating pressure for 30 minutes), then refill transformer oil. This simpler method avoids hot-tap equipment rental cost ($2,000-$5,000) but requires transformer outage coordination—suitable for installations during planned maintenance outages.
⚠️ Critical Safety Requirements for Hot-Tap Welding on Energized Transformers:
Electrical Hazards: Maintain minimum approach distances per NFPA 70E or IEC 61482: 3.0m for 220kV class, 3.6m for 500kV class. Establish restricted access zone with barriers and warning signs. Verify welder and assistants wear arc-rated clothing (minimum 8 cal/cm² rating) and insulated gloves if working within limited approach boundary.
Welding Procedure: Use only low-hydrogen electrodes (E7018 or equivalent) stored in heated rod oven preventing moisture absorption. Preheat tank surface to 50-75°C using induction heater—do not use open flame near transformer. Limit welding current to prevent excessive heat input: maximum 120A for 3.2mm electrode. Complete weld in single continuous pass; stopping mid-weld creates stress concentration leading to future crack formation.
Fire Prevention: Position fire extinguisher (minimum 9kg CO₂ or dry chemical) within 3 meters of work area. Station fire watch with radio communication to control room. Remove combustible materials (vegetation, trash, wooden pallets) within 10-meter radius. Cover nearby cable trenches preventing molten metal/slag from falling into cable layers. Have emergency transformer shutdown procedure prepared including coordination with system operator for load transfer before de-energization.
Oil Leak Prevention: Test hot-tap machine gate valve closure before drilling—pressurize chamber with nitrogen to 0.3 MPa and verify zero leak rate using soap solution. Keep valve closed until drill fully retracts and verifies clean cut (no metal chips visible in extracted core). If leak detected during drilling, immediately close gate valve and consult manufacturer technical support—do not attempt field repairs without proper training.
Phase 5: Sampling Line Installation and Heat Tracing (Week 1, Days 3-5)
Fabricate sampling line from seamless stainless steel tubing following measured routing path from transformer valve to DGA cabinet inlet. Use tube bender (minimum 5× tube diameter bend radius) creating smooth bends without kinks or flow restriction—sharp bends create turbulence causing gas bubble formation and false high readings. Support tubing every 1.5-2.0 meters using stainless steel clamps with vibration-dampening rubber inserts preventing metal-to-metal contact that accelerates fatigue failure.
Maintain continuous downward slope of 1:100 (1cm drop per meter horizontal distance) from transformer valve to DGA inlet allowing gravity drainage and preventing gas bubble accumulation. Use digital level or laser level verifying slope at each support point—mark support brackets before final installation ensuring proper slope maintained during tightening. For routing sections requiring upward slope (crossing cable trenches, avoiding obstacles), install loop seal: U-shaped trap filled with oil preventing gas migration into upper sections of sampling line.
Install self-regulating heat trace cable along entire sampling line length maintaining oil temperature >10°C above minimum ambient temperature preventing viscosity increase that restricts flow. Spiral-wrap heat trace cable around tubing with 150-200mm pitch providing uniform heat distribution, then secure with aluminum tape or cable ties (UV-resistant nylon, temperature rated to 85°C minimum). Connect heat trace power via dedicated circuit breaker (10-16A capacity) with ground fault circuit interrupter (GFCI) protecting against electrical shock if insulation damaged during service.
Apply thermal insulation over heat-traced sampling line using two-layer system: (1) Inner layer: 25mm closed-cell elastomeric foam preventing condensation on cold surfaces and reducing heat trace power consumption. (2) Outer layer: 25mm fiberglass or mineral wool providing additional R-value and mechanical protection. Seal all insulation joints with aluminum foil tape (minimum 50mm overlap) creating weather-resistant envelope. Install weatherproof jacketing (PVC or aluminum) over insulation for outdoor routing protecting against UV degradation, physical damage, and moisture ingress.
| Installation Activity | Duration | Personnel Required | Critical Quality Points |
|---|---|---|---|
| Foundation preparation & cabinet mounting | 8-12 hours | 2 technicians + 1 crane operator | Level within ±5mm, anchor torque 60-100 N·m, drainage verified |
| Hot-tap valve installation (energized) | 6-8 hours | 1 qualified welder + 2 assistants + 1 safety observer | Weld inspection (PT/MT), pressure test 1.5× operating pressure, zero leakage |
| Sampling line fabrication & installation | 12-16 hours | 2 technicians (tube bending/fitting) | Slope 1:100 minimum, support spacing 1.5-2.0m, no kinks in bends |
| Heat trace cable installation | 4-6 hours | 1 electrician + 1 assistant | Spiral wrap 150-200mm pitch, aluminum tape securing, power test OK |
| Thermal insulation application | 6-8 hours | 2 insulators | Dual layer (25mm+25mm), aluminum tape sealing, weatherproof jacket |
| Flow meter & filter installation | 2-3 hours | 1 technician | Flow direction marking, gasket installation, no over-torque on fittings |
| Analyzer internal connections | 4-5 hours | 1 technician (manufacturer-trained) | Tubing connections leak-free, electrical terminals torqued per spec |
| Power wiring & grounding | 3-4 hours | 1 licensed electrician | Voltage correct, polarity verified, ground resistance <1 Ω, GFCI test |
| Communication wiring & testing | 4-6 hours | 1 technician (SCADA experience) | Cable continuity OK, RS-485 termination correct, Ethernet link up |
| System leak test & flushing | 3-4 hours | 2 technicians | Pressure hold test 0.5 MPa / 30 min, oil flushing until clean |
| Calibration & commissioning | 6-8 hours | 1 manufacturer technician + 1 site engineer | Zero/span calibration, accuracy verification, alarm setpoint configuration |
| Documentation & training | 4-6 hours | Manufacturer technician + operations/maintenance staff | As-built drawings approved, test reports signed, hands-on operation demonstrated |
Phase 6: Flow Meter and Filtration System Installation (Week 1, Day 5)
Install flow meter in sampling line between transformer valve and DGA analyzer inlet allowing real-time flow rate monitoring detecting pump failures, valve blockages, or line restrictions. Turbine-type flow meters require minimum straight pipe sections before and after the meter body (10× pipe diameter upstream, 5× downstream) ensuring fully developed laminar flow for accurate measurement. For 10mm tubing: install 100mm straight section upstream, 50mm downstream of flow meter body.
Orient flow meter according to directional arrow marked on meter body—reversed installation produces erratic readings or zero output despite oil flowing. Mount flow meter with axis horizontal or vertical (upward flow only), never with axis downward as this promotes gas bubble accumulation in meter body. Install isolation valves upstream and downstream of flow meter (ball valves DN15) allowing removal for calibration or replacement without draining entire sampling system.
Install particulate filters immediately after transformer sampling valve protecting all downstream components from contamination. Use duplex filter configuration: two parallel filter housings with three-way selector valve allowing switching between filters without interrupting DGA operation—clean one filter while other remains in service. Each filter housing contains 100-micron primary element (stainless steel mesh) and 10-micron secondary element (pleated polypropylene).
Install pressure gauges (0-1.0 MPa range, liquid-filled for vibration dampening) before and after filter assembly measuring differential pressure indicating filter clogging. Initial pressure drop with clean filter: 10-20 kPa at 200 ml/min flow rate. Replace filter elements when differential pressure exceeds 100 kPa or quarterly, whichever occurs first. Record filter change dates and differential pressure in maintenance log identifying transformers with high contamination requiring oil reconditioning.
Phase 7: Internal Analyzer Connections and Vacuum System (Week 2, Days 1-2)
Connect sampling line to DGA analyzer inlet using compression fitting (Swagelok or equivalent, 6-10mm tube size) ensuring proper ferrule installation preventing leaks under vacuum operation. The inlet connection typically locates on analyzer rear panel or bottom surface depending on cabinet design. Install inlet shutoff valve (ball valve, SS316L, DN10) between sampling line and analyzer allowing isolation during analyzer maintenance without disrupting sampling line integrity.
Verify vacuum pump operation before connecting to degassing membrane: measure pump performance using vacuum gauge (0-100 kPa range, ±1 kPa accuracy) at pump inlet while blocking outlet—pump should achieve 5-10 kPa absolute pressure within 60 seconds startup. Poor vacuum indicates diaphragm wear requiring replacement or valve plate contamination requiring cleaning. Document baseline vacuum performance for future comparison during preventive maintenance.
Connect degassing membrane to vacuum pump and gas analyzer using fluoropolymer tubing (PTFE or FEP, 6mm OD) resistant to carrier gas (hydrogen) and sample gas corrosion. Use only fluoropolymer-compatible compression fittings—brass fittings corrode when exposed to moisture and dissolved gases causing contamination. Install check valve between membrane and vacuum pump preventing oil backflow into pump during shutdown or power failure—backflow contaminates pump internals requiring costly overhaul.
(1) Close inlet valve isolating analyzer from sampling line.
(2) Start vacuum pump and monitor vacuum gauge until pressure stabilizes (typically 60-90 seconds).
(3) Record stabilized vacuum pressure (should be 5-15 kPa absolute for diaphragm pumps).
(4) Stop vacuum pump and close pump isolation valve trapping vacuum in system.
(5) Monitor vacuum pressure for 15 minutes—pressure rise <5 kPa indicates acceptable leak rate.
(6) Pressure rise >10 kPa indicates significant leak: check all compression fittings, membrane housing O-rings, and tubing connections using soap solution leak detection.
(7) Repair leaks and repeat test until leak rate acceptable before proceeding to commissioning.
Phase 8: Electrical Power and Grounding Installation (Week 2, Day 2)
Connect DGA analyzer to AC power source matching analyzer nameplate specifications (typically 110-240VAC ±10%, 50/60Hz, single-phase, 300-1500W depending on analyzer type and cabinet heating/cooling load). Install dedicated circuit breaker in substation auxiliary power panel (16-32A rating, Type C or D characteristic curve) providing short-circuit protection and manual disconnect capability for maintenance.
Route power cable from circuit breaker to DGA cabinet through underground conduit or cable tray following substation cable routing standards. Use armored cable (steel wire armor, XLPE or EPR insulation, copper conductors minimum 2.5 mm² for loads <3 kW) providing mechanical protection and water resistance. Terminate cable in cabinet junction box using cable gland (brass nickel-plated, IP66 rating) with proper strain relief preventing cable movement from stressing electrical connections.
Install dedicated grounding electrode for DGA system independent of transformer frame grounding preventing ground loop currents that induce noise on sensitive sensor circuits. Drive copper-clad steel ground rod (16mm diameter, 2.4m length minimum) into earth adjacent to DGA cabinet achieving ground resistance <5 Ω—verify using ground resistance tester (3-point fall-of-potential method or clamp-on method). In rocky or sandy soil where low resistance difficult to achieve, install multiple ground rods in triangular array (3m spacing) connected with bare copper conductor (25-35 mm²) or use chemical ground enhancement compound increasing soil conductivity.
Bond analyzer cabinet frame, sampling line, and heat trace cable conduit to grounding electrode using copper conductor (minimum 16 mm² bare or 10 mm² insulated). Use listed grounding connectors (lugs, clamps, exothermic welds) providing permanent low-resistance connections—verify each bond measures <0.1 Ω resistance using digital multimeter in 4-wire Kelvin measurement mode. Install surge protection device (SPD) on AC power input inside cabinet: Type 2 SPD per IEC 61643-11 with maximum discharge current rating 40 kA (8/20 μs waveform), voltage protection level <1200V for 230V systems.
Phase 9: Communication System Installation and Configuration (Week 2, Days 3-4)
Install communication cables from DGA analyzer to SCADA remote terminal unit (RTU), substation automation system, or dedicated communication network equipment. Cable type depends on communication protocol and distance: RS-485 serial uses shielded twisted-pair cable (18-22 AWG, 120Ω characteristic impedance) for distances up to 1200 meters; Ethernet uses Cat5e/Cat6 UTP cable (100m maximum) for copper connections or fiber optic cable (multimode OM3/OM4 up to 300m, singlemode OS2 up to 40 km) for longer distances or electrical isolation requirements.
For RS-485 installations, configure bus topology with daisy-chain connections from RTU through DGA analyzer to next device. Install 120Ω terminating resistors at both physical ends of RS-485 bus (first and last device) preventing signal reflections that corrupt data—verify termination by measuring resistance between A and B terminals with all devices powered off (should measure 60Ω with both terminators installed, 120Ω with one terminator installed). Configure DGA analyzer Modbus address (1-247) avoiding conflicts with other devices on same bus—document address in SCADA configuration database.
For Ethernet installations using Modbus TCP or IEC 61850, configure IP address within substation network address range coordinating with IT/OT network administrator. Use static IP addressing rather than DHCP ensuring consistent address for SCADA polling. Configure subnet mask matching network topology (typical 255.255.255.0 for /24 subnet) and default gateway pointing to router/switch providing connectivity to control center. Test network connectivity using ping command verifying round-trip time <50 ms and zero packet loss over 100-packet test sequence.
For IEC 61850 installations, configure Logical Nodes matching utility’s standardized naming conventions: typical DGA analyzer Logical Nodes include MMXU (metering and measurement), STMP (temperature measurement), SPDC (surge protection device control), XCBR (circuit breaker status if connected to automatic tripping logic). Load IEC 61850 configuration file (CID or ICD format) into analyzer using software tool provided by manufacturer—verify all data objects correctly mapped to physical measurements and confirm report control blocks configured for data transmission at required update rates (typically 1-minute for continuous measurement, 5-second for fault recording mode).
| Communication Protocol | Physical Layer | Advantages | Disadvantages | Best Use Case |
|---|---|---|---|---|
| Modbus RTU | RS-485 serial, 9600-115200 baud | Simple, robust, widely supported, low cost | Limited bandwidth, master-slave only, no time synchronization | Legacy substations, distribution transformers, budget constraints |
| Modbus TCP/IP | Ethernet 10/100 Mbps | Higher bandwidth, multi-client access, familiar IT networking | Cybersecurity risks, no standardized data models, requires Ethernet infrastructure | Modern substations with existing Ethernet networks |
| IEC 61850 | Ethernet 100 Mbps, fiber optic recommended | Standardized data models, GOOSE peer-to-peer messaging, time sync (PTP) | Complex configuration, limited technician familiarity, higher cost | Transmission substations, IEC 61850-compliant automation systems |
| DNP3 | RS-485 serial or Ethernet (TCP/IP or UDP) | Event-driven reporting, time synchronization, secure authentication | More complex than Modbus, requires DNP3 master device | North American utilities, critical infrastructure with cyber requirements |
| Cellular (4G/5G) | LTE/5G modem with SIM card | No infrastructure wiring, remote locations, mobile access | Recurring data charges, variable latency, coverage dependent | Remote transformers, temporary installations, backup communication |
| Fiber optic direct | Singlemode/multimode fiber, serial or Ethernet | Electrical isolation, EMI immunity, long distance (40+ km) | Higher cable cost, requires fiber infrastructure, splice expertise | Generating stations, HVDC converter stations, heavy EMI environments |
Phase 10: System Pressure Testing and Oil Circulation (Week 2, Day 4-5)
Before introducing transformer oil into sampling system, perform comprehensive pressure testing verifying all connections leak-free under operating pressure conditions. Close DGA inlet isolation valve and install pressure test pump (hand pump with pressure gauge 0-2.0 MPa range) to sampling line at transformer valve location. Slowly pressurize system to 0.5 MPa (5× typical operating pressure) monitoring pressure gauge—system should hold pressure without decrease for 30 minutes minimum indicating zero external leaks.
While system remains pressurized, inspect all fittings, valves, and tubing joints using soap solution leak detection: spray or brush soap solution onto connection surfaces and observe for bubble formation indicating escaping pressurized air. Even tiny leaks invisible to naked eye produce detectable bubbles. Mark any leaking connections with permanent marker, depressurize system, tighten or remake connections, then repeat pressure test until no leaks detected.
After successful pressure testing, introduce transformer oil into sampling system: slowly open transformer sampling valve allowing oil to flow into sampling line displacing air. Position 5-liter collection bucket at DGA inlet connection and allow oil to flow freely for 10-15 minutes flushing all air from sampling line—discard flushed oil as it may contain metallic particles, welding flux residue, or moisture from installation activities. Continue flushing until oil stream contains no visible bubbles and flows steadily without pulsation indicating complete air evacuation.
Connect sampling line to DGA analyzer inlet and start analyzer oil circulation pump. Monitor flow meter display verifying flow rate stabilizes at design setpoint (typically 200-300 ml/min for most analyzers). Unstable flow indicates trapped air pocket, partially closed valve, or filter restriction—identify and correct cause before proceeding. Circulate oil through analyzer for minimum 2 hours allowing complete system wetting: oil saturates all internal surfaces, fills deadband volumes in fittings and components, and establishes stable temperature equilibrium throughout sampling path.

Fiber optic temperature sensor, Intelligent monitoring system, Distributed fiber optic manufacturer in China
 |
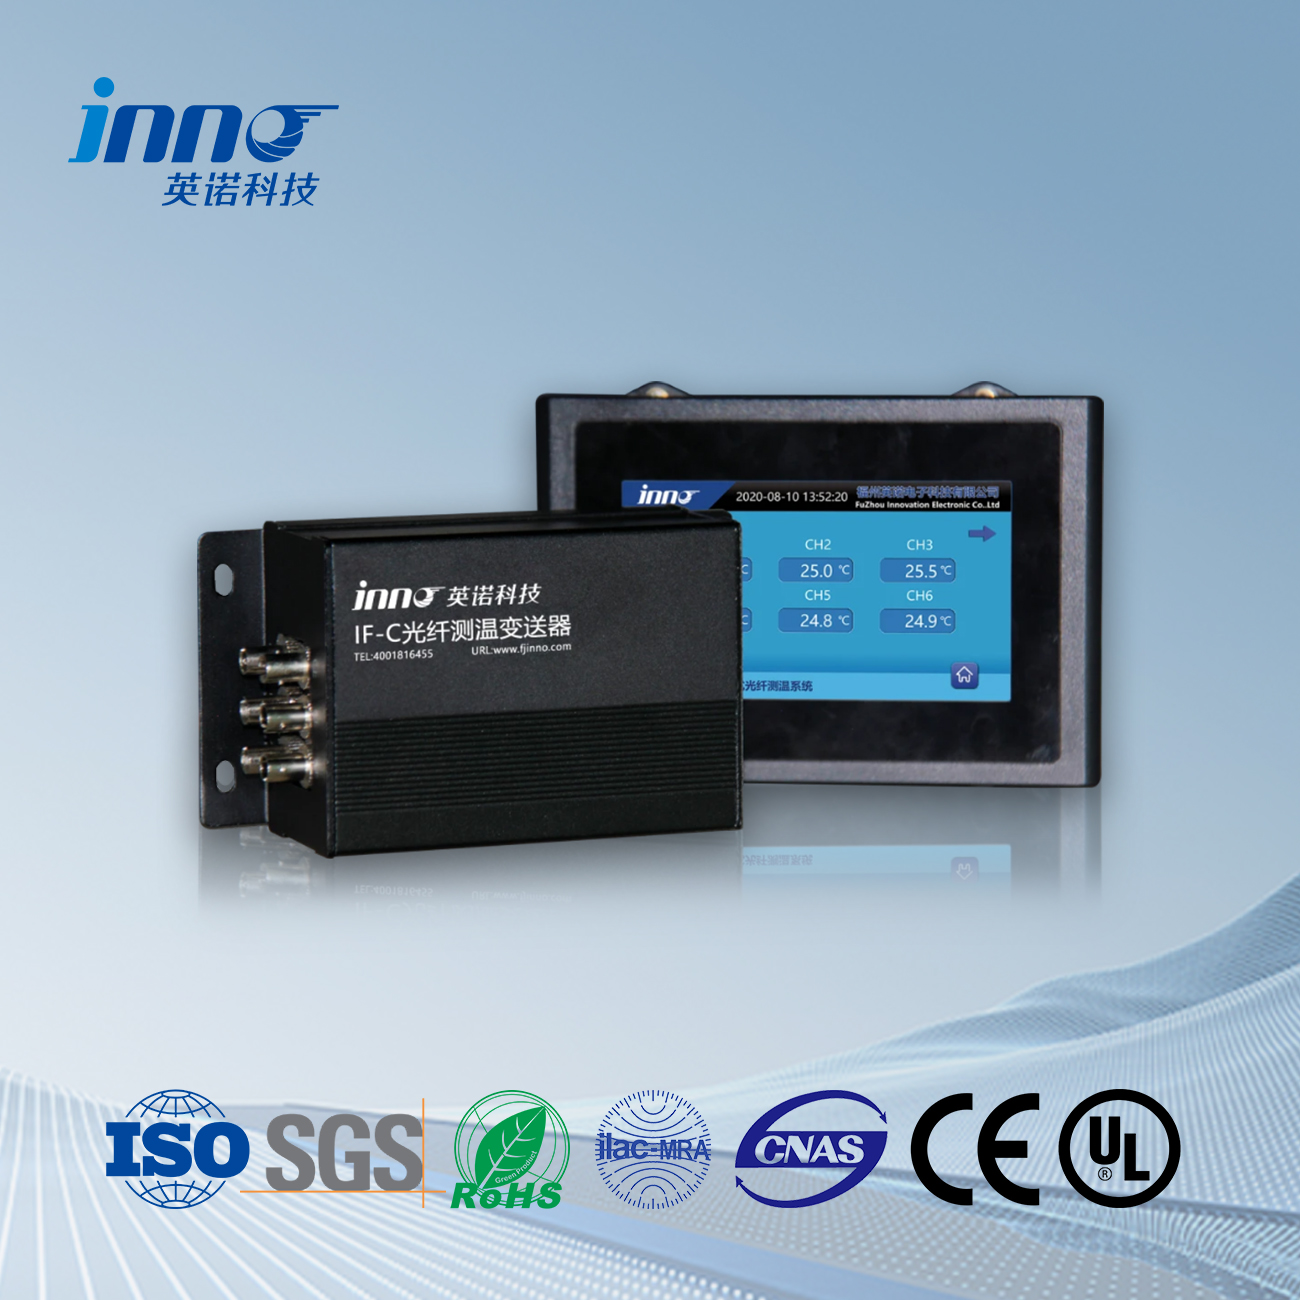 |
 |